Concrete installation is one of the most durable and versatile solutions for outdoor landscaping projects. From patios and walkways to decorative features and retaining walls, properly installed concrete can transform your outdoor spaces. In this step-by-step guide, Land x Landscape Construction in Ontario, California, shares expert tips, practical examples, and trends to help homeowners achieve a professional-grade installation.
Step 1: Planning Your Concrete Project
A successful concrete project starts with careful planning. Before pouring a single slab, it’s essential to consider the purpose, design, and practical constraints of your installation.
Key Considerations:
- Purpose of the Space: Decide if your concrete area is for a driveway, patio, walkway, or decorative feature. Each type requires different thicknesses, finishes, and reinforcement.
- Design Elements: Think about textures, stamped patterns, and colors. Decorative concrete can imitate stone, wood, or tile for a premium look.
- Measurements and Layout: Accurately measure your space to calculate the volume of concrete required. Include extra for cutting or adjustments.
- Local Regulations: Ontario, California has specific rules for drainage, slope, and zoning. Check with local authorities before starting your project.
Proper planning reduces mistakes, prevents budget overruns, and ensures your concrete installation lasts for decades.
Step 2: Preparing the Site
Site preparation is a critical step that directly impacts the longevity and stability of your concrete installation.
Preparation Steps:
- Clear the Area: Remove grass, weeds, rocks, and debris. This provides a clean surface for your base.
- Excavation: Depending on the intended load, dig 4–6 inches for walkways and patios, or 6–8 inches for driveways and heavy-use areas.
- Leveling and Compaction: Use a compactor to firm up the soil. A solid base prevents cracking and uneven surfaces.
- Formwork Installation: Construct wooden or metal forms to outline your concrete area. Ensure forms are straight, level, and firmly staked.
Step 3: Reinforcing Your Concrete
Reinforcement ensures your concrete can withstand weight, weather, and movement over time.
Common Reinforcement Methods:
- Wire Mesh: Ideal for patios, walkways, and small slabs. Provides basic structural support.
- Rebar: Recommended for driveways, large slabs, or areas subject to heavy loads. Rebar should be positioned in the center of the slab for maximum strength.
- Fiber Additives: These mixed-in fibers can help control cracking in small decorative projects.
Proper reinforcement reduces maintenance costs and enhances the durability of your installation.
Step 4: Pouring the Concrete
Pouring is where planning and preparation meet execution. Follow these steps for a smooth, professional finish.
Mixing Concrete:
- Use ready-mix concrete delivered by truck for larger projects.
- For small DIY projects, combine cement, sand, gravel, and water in the recommended ratio.
Pouring Process:
- Begin pouring at one end of the form, spreading evenly.
- Use a screed board to level the surface across the forms.
- Apply a bull float to smooth out imperfections.
- Edge the concrete to create clean lines for your forms.
Step 5: Finishing Your Concrete
The finish affects both appearance and functionality. Choose based on design goals and safety requirements.
Popular Finishing Techniques:
- Broom Finish: Creates a textured surface for walkways and driveways, reducing slip hazards.
- Trowel Finish: Smooth, polished surface for patios or decorative features.
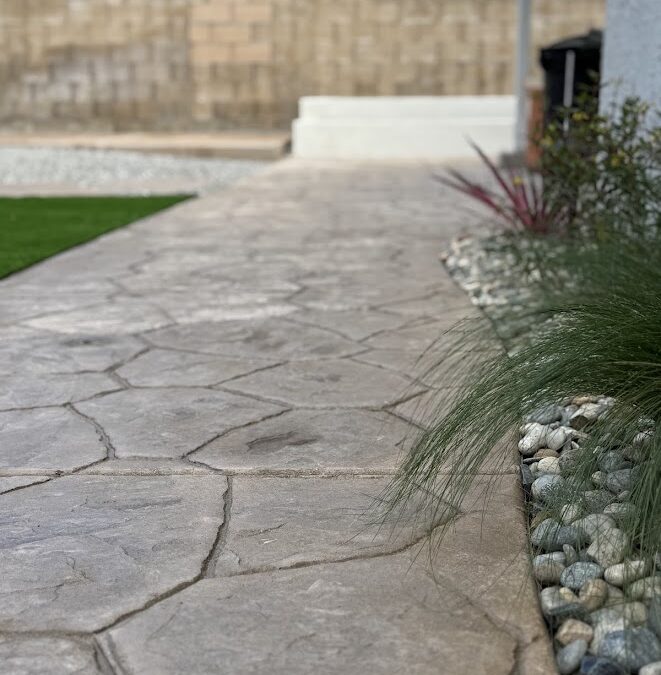
- Stamped Concrete: Imitates natural materials like stone, brick, or wood. Popular for modern hardscape design.
- Exposed Aggregate: Reveals small stones in the concrete for a decorative, textured finish.
Adding Color:
Concrete stains, dyes, and integrally colored mixes allow you to customize your project to match landscaping themes. Earth-tone colors such as browns, grays, and tans are trending for 2025.

Step 6: Curing and Sealing Concrete
Curing and sealing ensure your concrete reaches maximum strength and durability.
Curing Process:
- Keep concrete moist for at least 7 days to prevent cracking and shrinking.
- Cover with plastic sheeting or spray with a curing compound to retain moisture.
Sealing:
- Apply a high-quality concrete sealer after curing.
- Benefits include protection against stains, water penetration, and UV damage.
- Reapply every 1–2 years for optimal protection.
Step 7: Landscaping Ideas with Concrete
Concrete is versatile in landscaping, offering both functional and aesthetic solutions.
Ideas for Concrete Landscaping:
- Walkways and Pathways: Use pavers or slabs to create clean, defined paths.
- Patios and Outdoor Living Spaces: Install patios for dining, entertaining, or lounging.
- Retaining Walls: Manage slopes and create tiered gardens with poured or block walls.
- Decorative Features: Fire pits, planters, and water features add interest and value.
- Hardscape Design Concrete Trends: Incorporate stamped patterns, geometric layouts, or mixed materials like wood and stone for modern appeal.
Step 8: Trending Concrete Designs for 2025
Staying current with trends adds value and aesthetic appeal to your installation.
- Permeable Concrete: Supports water absorption to reduce runoff and promote sustainability.
- Earth-Tone Finishes: Colors that blend naturally with plants and landscape.
- Textured Surfaces: Exposed aggregate, stamped patterns, and decorative edges are increasingly popular.
- Outdoor Living Integration: Concrete islands, seating walls, and combined BBQ/patio setups for social spaces.
Step 9: Maintenance Tips
Proper care extends the life and beauty of your concrete installation.
Maintenance Checklist:
- Regular Cleaning: Sweep, hose, or pressure wash surfaces periodically.
- Crack Repair: Fill small cracks promptly to prevent water infiltration and larger damage.
- Sealer Reapplication: Every 1–2 years to maintain protection.
- Avoid Heavy Impact: Use caution with heavy machinery or when dropping heavy objects.
Regular maintenance preserves the investment in your landscaping and hardscape design.
Why Choose Land x Landscape Construction
Land x Landscape Construction specializes in concrete installation and landscaping services in Ontario, California. With years of experience, our team combines design expertise with hands-on installation skills.
What Sets Us Apart:
- Professional Planning: Tailored layout and design for your property.
- Expert Installation: Quality workmanship with attention to detail.
- Local Knowledge: Understanding of local building codes and climate considerations.
- Full-Service Landscaping: From concrete patios to integrated outdoor features.
We provide both commercial and residential services, ensuring every project meets high-quality standards.
Frequently Asked Questions
- How long does concrete take to cure?
Concrete typically takes 28 days to fully cure, but it reaches an initial set within 24 hours. - Can I install concrete myself?
DIY is possible for small projects, but professional installation ensures proper mixing, reinforcement, and finishing for longevity. - What is the best time of year for installation?
Late spring to early fall is ideal in Ontario, California, when temperatures allow proper curing and minimal rain interference. - How can I prevent cracking?
Use proper site preparation, reinforcement, and timely sealing to reduce the risk of cracks. - What types of concrete finishes are available?
Broomed, troweled, stamped, and exposed aggregate finishes are common, each offering aesthetic and functional benefits. - How do I choose the right concrete design for my landscaping?
Consider your property’s style, functional needs, and integration with other landscape features. A consultation with professionals ensures optimal design and installation.
Conclusion
Concrete installation offers homeowners a durable, versatile, and visually appealing solution for patios, walkways, and landscaping projects. By following proper planning, preparation, pouring, and maintenance techniques, your outdoor spaces can last for decades.
For expert concrete installation and landscaping services in Ontario, California, contact Land x Landscape Construction today at https://www.landxlandscapeconstruction.com/ or visit us at 2033 East Deodar Street. Let our team guide you from concept to completion.
Get Your Free Step-by-Step Concrete Installation Guide Now
- Learn More: Discover expert tips and step-by-step instructions for concrete installation.
- View All: Browse all guides, images, and ideas for concrete installation projects.
Learn Expert Concrete Installation Secrets and Creative Ideas
- Why Concrete Cracks. Can it be avoided?
- The Benefits of Stamped Concrete: Enhancing Your Outdoor Space
- TOP 4 DECORATIVE CONCRETE IDEAS